


Driveshaft Maintenance
Abstract
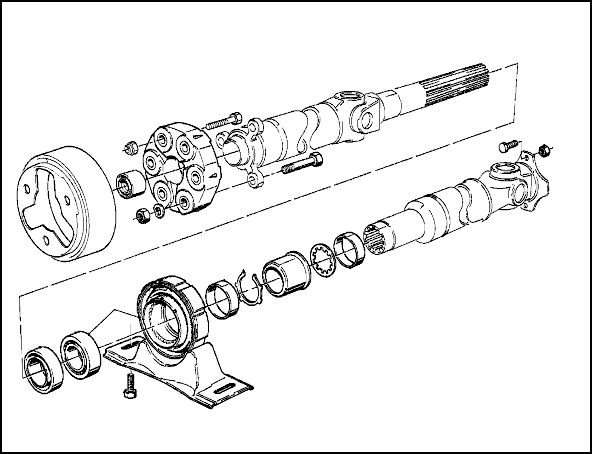
There will inevitably come a time when the driveshaft will need some maintenance. The most common points of failure are the guibo (flex disc), and the center support bushing (CSB). The universal joints are pressed in, and replacing them is best left to professionals. The nest course of action when they go is to buy a remanufactured one & turn in the old one for a core refund. The scope of this article covers the removal of the shaft. It is a good idea to do so when replacing the guibo, as well as when doing the CSB. You can get away with only removing the front half for both, but it is a good idea to pull the whole thing to check for damage. Better safe than sorry afterall!
The common signs of a worn guibo are loud clunking noises when depressing the clutch. They can often be felt, as well as heard. The CSB's indicative wear sign is loud, harsh vibrations atspeeds of 30mph and above. Do NOT let this go unattended for a long time as the CSB will only be torn further and further apart as time passes. This can lead to damage to the driveshaft, which is an expensive piece ($325+ for a rebuilt unit). If driven at high speed, a sudden, catastrophis failure could be possible, and that would cause thousands of dollars in damage, and possibly even serious personal injury from the shaft braking, spinning wildly, and tearing into the cabin. Now that I am done scaring you, get to it!
Tools
Assortment of Metric Sockets & Drives (3/8" & 1/2")
Assortment of Metric Box Wrenches
Channel-Locks (Large Pliers)
Needle-Nose Pliers
Assortment of Flat-Blade Screwdrivers
Required Parts
Guibo [PN 26-11-1-225-624]
Center Support Bushing *Should include bearing with mount* [PN 26-12-1-226-723]
Procedure
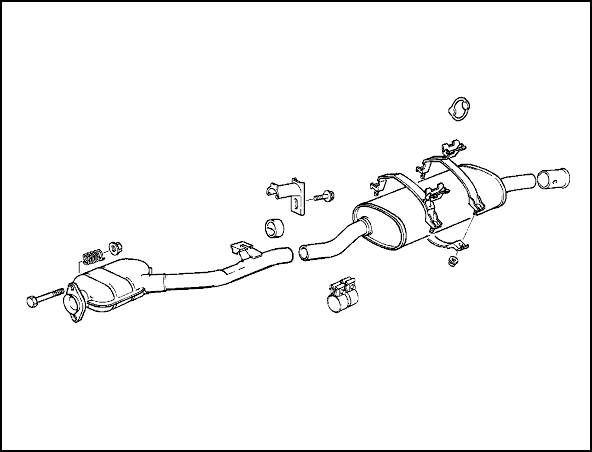
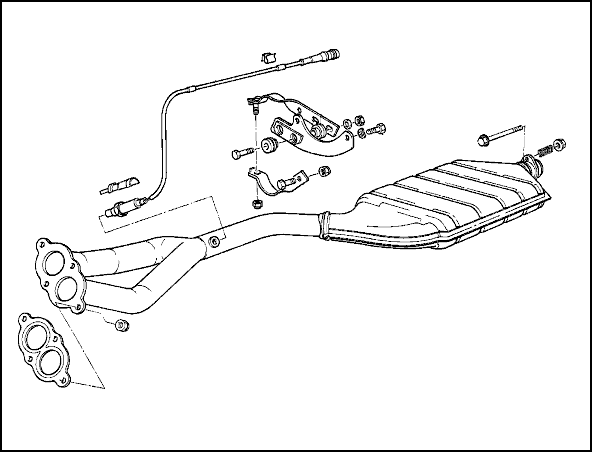
Remove the catalyst & muffler portions of the exhaust. There are 4 14mm nuts up front holding the cat section to the header. Disconnect the O2 sensor up top (the connector is under the tray on the passenger side). Make sure the sensor sire is unclasped from the clips on the body so it is not damaged when removing the exhaust from the car. Unbolt the hangar that is attached to the transmission from the pipe. Remove the 15mm bolt holding the muffler section before the muffler itself (the part with the rubber donut thingy on it). Remove 2 nuts holding the hangars clasped around the muffler itself. Carefully remove the whole thing. Don't worry about bending the clasps, they will bend back if not creased. Then remove all the heat-shielding that is in the way.
Make sure the rear wheels are on stands (preferably all 4). Put the jack under the transmission, and BARELY put it in contact with the transmission. Loosen the 13mm nuts holding the transmission bracket in place. Loosen the 13mm nuts on top of the mounts. Slide the bracket out, or just remove it, whatever is easier.
NOTE: If you have 2 floor jacks, then you can leave one under the tranny while raising the wheels. Re-inserting the brace is only necessary if you have 1 jack to work with.
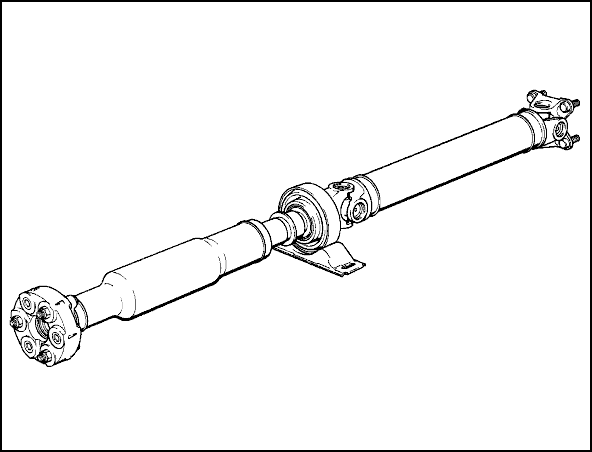
Behind the center support bearing there is a very large collar nut on the driveshaft holding the 2 pieces tightly together. Unless you have like a 25mm wrench (do not know the actual size, but it is BIG), you will need some channel-locks (large adjustable pliers) to get it loosened. Once it is broken free, it can be undone by hand. Unscrew it & slide it forward to be sure it is not caught on anything. Here is where it takes some elbow grease. Remove the 2 13mm bolts holding the support bearing. The whole shaft should be wiggling around now, but not off. There is a small shaft on the front end of the driveshaft (maybe 12mm diameter, a good 40-50mm" long) that sticks into the transmission's output flange. You will need to wiggle & push/pull the front portion of the driveshaft backwards. This will slide the splined end of the front half into the rear half, shortening it. Eventually you will be able to get it off of the transmission with enough pushing & finagling. Before removing it, be sure to mark the relationship of the 2 halves. There are 12 or more possible ways to put the two halves back together, and only ONE proper one. The two halves were balanced together as a unit, and if improperly aligned, will be a very noisy, expensive nightmare. Mark their relation WELL. Not all had the relationship marked from the factory, so do it yourself just in case. Then just pull it out. Be careful not to drop it or ding it. Whether it is reusable or not, such things can really mess one up.
Remove the guibo if it is being replaced. Luckily, all you have to do is pop it into neutral to rotate it since it is no longer connected to the wheels. Just be sure to put it in 1st gear. This will minimize the amount everything turns when wrenching, and believe me, those bolts take some brute force to get loose. A rubber mallet is a good tool to use with the wrench to get them loose. If you have an impact gun, use it. Look into replacing the nuts/bolts if you want, impact guns can cause damage to bolts.
Removing the CSB can be a little tricky. There is a dust cover that you will need to pry off, and under that is a large lock-ring. Some needle-nose pliers and a small flat-blade screwdriver should be sufficient to remove it, and from there the CSB can be removed from the driveshaft.
Do what you want with the driveshaft, and put it (or a replacement) in. Read this backwards & that is a job well done. Wash up, crack a beer, and be glad it is over. Writing this made me tired, and I did it off the top of my head!
Conclusions & Results
This is a relatively straightforward procedure, and should improve the drivability of the car if the CSB or guibo was worn out. The CSB can be had for ~$50 online, and the guibo for ~$35.
DISCLAIMER: I take no responsibility (and thus I cannot be held responsible) for damages and/or injuries caused by attempting the procedures outlined on this site. The information provided is to be used at the reader's discretion and all necessary safety precautions requiring emplacement (mentioned or not) are the responsibility of the reader.